Guides › OCR (read text)
OCR: read text and labels
Updated 6 October 2026 · Quickey 1.10 (build 16)
OCR reads printed text with the camera. Left alone it types everything it sees. With Read & extract on, it types only what you want: one value, or several label fields such as Part No and Serial No in your own order.
On this page
The OCR pageScan textPick textOCR accuracyCapture settingsRead & extractAI fieldsVerify with barcodeBasic rulesRegular expressionPrefix and suffixTest your patternThe OCR page
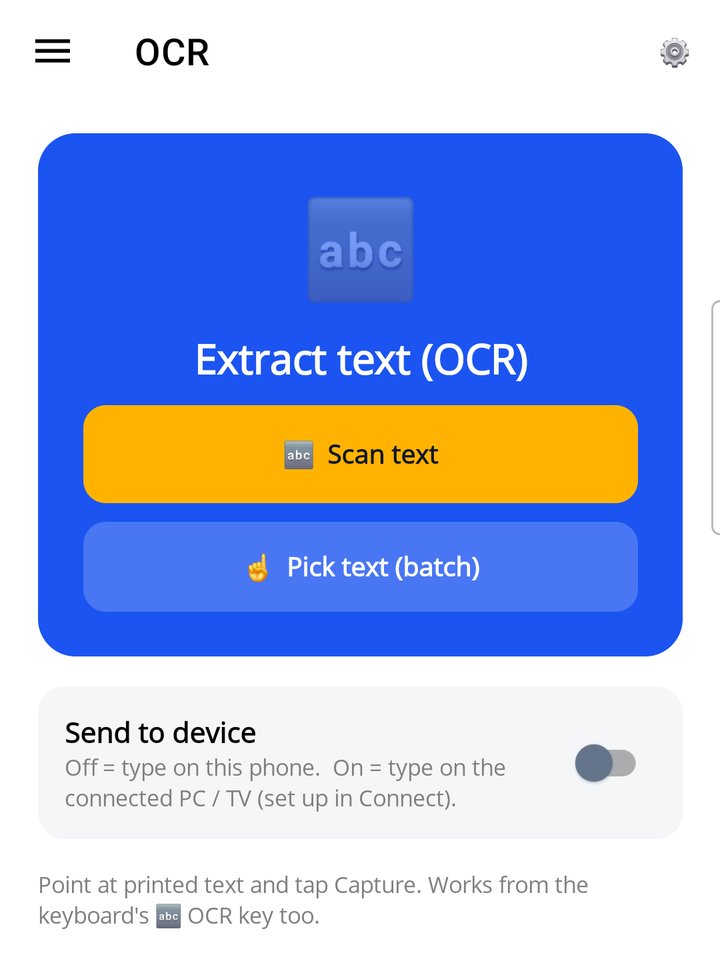
Open ☰ › OCR. There are two buttons:
- Scan text: point at one label. Quickey sends the text, or the fields you chose (next section).
- Pick text (batch): take a photo and tap the lines you want, or read many labels in a row (Pick text).
The result appears under LAST TEXT. From the keyboard's 🔤 OCR key or the floating button it is typed at the cursor.
Send to device works as on the Barcode page: off types on the phone, on types on the connected PC or TV. If the text contains a phone number, a WhatsApp button appears so you can open a chat with it.
Tap ⚙️ for OCR Settings.
Free and Business. Scan text is free at accuracy level 1 (Fast) with all text, Basic, Regex and Label rules. Pick text, AI fields, Verify with barcode and levels 2 to 5 are part of Quickey Business (the plan, or Business credit from a video). Without Business, AI fields send all the text instead.
Scan text
Tap Scan text. The camera opens full screen. The top bar says Scan text and, under it, what Quickey is looking for, for example Finding: Part No · Serial No. These are the fields you chose in OCR Settings. The torch button lights a dark label.
Where to point
- With fields (AI fields or Label mode): there is no aim box. Quickey reads the whole view. Every field it finds gets a green outline with its name, for example Serial No ✓.
- Without fields (all text, Basic or Regex): a white aim box shows. Only the text inside the box is read.
The panel at the bottom
| You see | It means |
|---|---|
| Point at the label | Nothing found yet. |
| Found 1 of 2 — Looking for Part No | One field is read. Quickey is still looking for the other. |
| Hold still… and a ring that fills | Everything is found. Keep the phone steady for a moment. |
| Reading with AI… About 2 seconds. Checking against the barcode | The AI is reading your fields (Business). |
| Green card Sent to the cursor | Done. The card lists each field and its value. A note such as OCR read I9638527410, fixed by the barcode tells you when the barcode corrected a value. |
Under the heading there is one pill per field: green with ✓ means found, amber means still looking.
- The round white button is Capture. It sends what was found now, even if a field is still missing.
- Many labels? Use Pick text opens Pick text.
The same label is not sent twice while it stays in front of the camera. The first time you open Scan text, a tip card explains the screen. It shows only once.
Pick text (batch) Business
Use Pick text when one photo has many lines you need.
- Tap Pick text (batch) and take a photo with the round shutter.
- Every line of text gets an outline. Tap the lines you want, in the order you want them. They are numbered 1, 2, 3. Select all picks every line.
- Tap Done. The lines are sent in that order.
After a photo the shutter shows a retake arrow. Tap it to take the photo again.
AI rows: many labels in a row
With AI fields set in OCR Settings, the screen is called Pick text · AI rows. Each Capture becomes one row with your fields. The camera stays live, so you can point at the next label and capture again at once. Rows fill in while the AI reads them (Reading…). Tap ✕ on a row to remove it, Clear to start again, and Done to send all rows.
The result shows on the OCR page as a batch card with the photos and Copy, Share and Send to PC. AI rows have no photos.
OCR accuracy
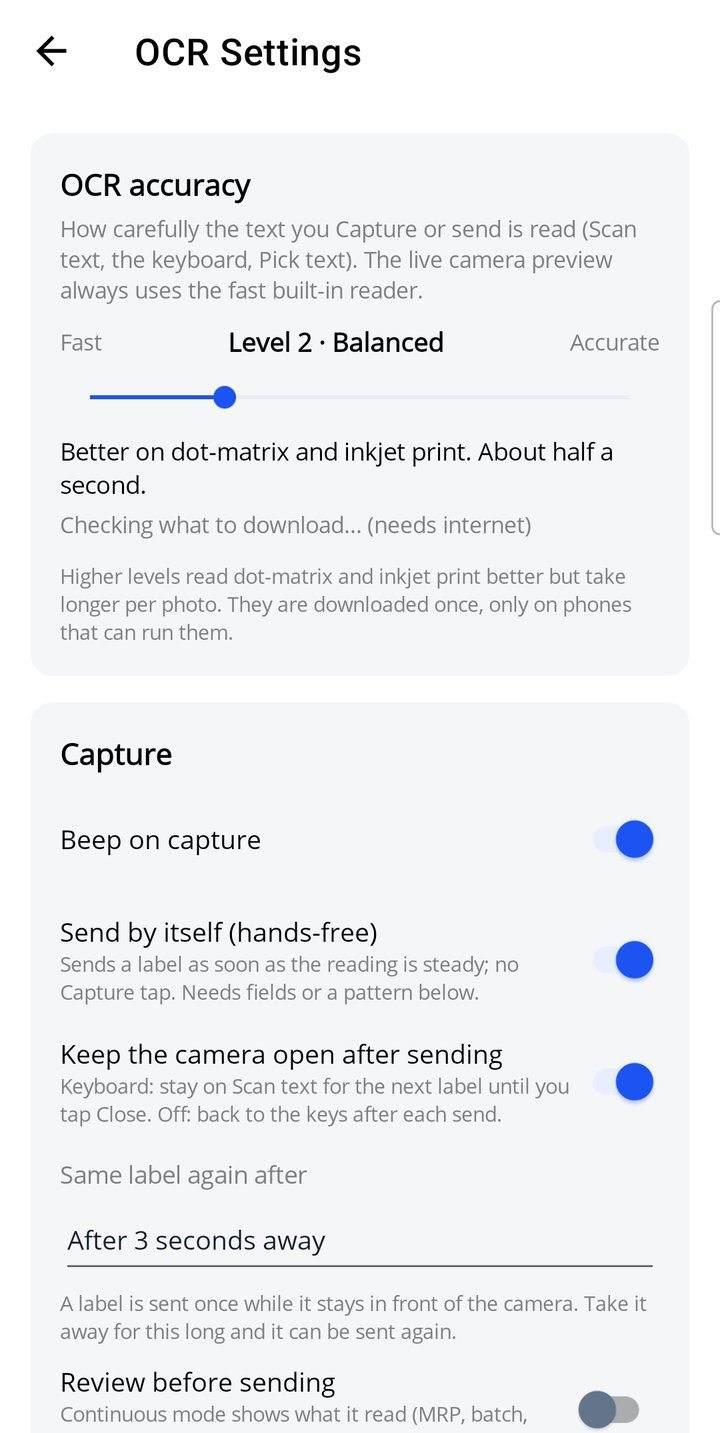
The slider at the top of OCR Settings sets how carefully text is read. Higher levels read hard print better but take longer.
| Level | Time per photo | Good for |
|---|---|---|
| 1 Fast | Instant | Clear print. The built-in reader. Free. |
| 2 Balanced Business | About 0.5 s | Dot-matrix and inkjet print |
| 3 Accurate Business | About 1 s | Small or faint print |
| 4 Precise Business | A few seconds | When level 3 is not enough |
| 5 Maximum Business | Several seconds | The hardest print |
- Levels 2 to 5 are downloaded once, and only offered on phones that can run them.
- The level is used when you Capture or send, and in Pick text. The live camera preview always uses the fast reader.
- Without Business, text is read at level 1.
Capture settings
- Beep on capture: a beep after each capture.
- Send by itself (hands-free): sends a label as soon as the reading is steady. You do not tap Capture. It needs fields or a pattern (Read & extract), otherwise it would send every frame. This used to be called Continuous mode.
- Keep the camera open after sending: for the keyboard. On: Scan text stays open for the next label until you tap Close. Off: back to the keys after each send.
- Same label again after: a label is sent once while it stays in front of the camera. Take it away for this long and it can be sent again.
- Review before sending: in hands-free mode, shows what was read (MRP, batch, expiry…) with Send and Retake.
- Text resolution: 720, 1080 or 1440. 1080 is recommended. Higher helps tiny print and barcodes, but is a little slower.
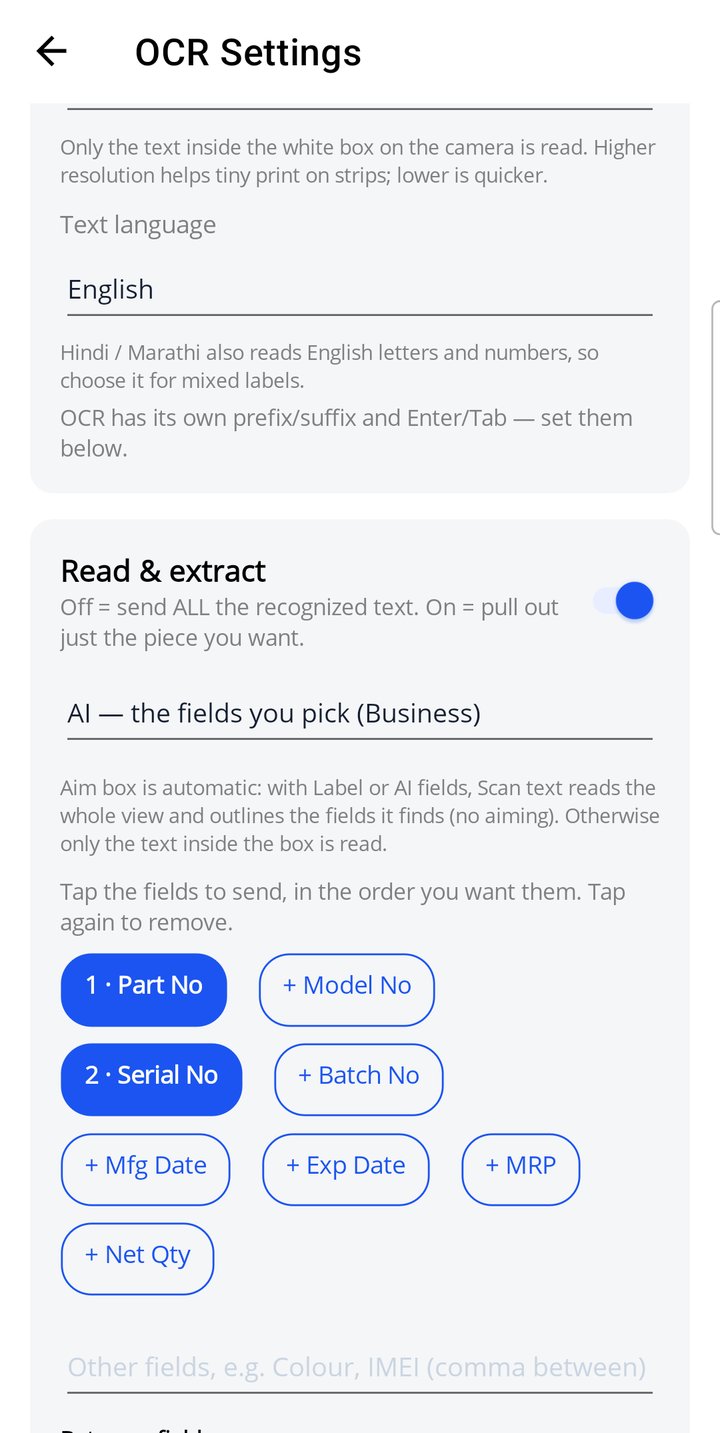
- Text language: the script on your labels. Hindi / Marathi also reads English letters and numbers, so choose it for mixed labels.
OCR has its own prefix, suffix and Enter/Tab, separate from Barcode Settings. See Prefix and suffix.
Read & extract
Read & extract off sends all the recognized text. On, it shows a Mode picker:
| Mode | What is sent |
|---|---|
| Basic, simple rules | One piece found with Find, Pick and Validate (below) |
| Advanced, regular expression | The first match of your pattern (below) |
| Label | MRP, batch, expiry, PAN and more. Each field is read by the word printed next to it and typed with Tab between them. |
| AI, the fields you pick Business | The fields you tap, in your order (next section) |
The aim box is automatic. With Label or AI fields, Scan text reads the whole view and outlines the fields it finds, so you do not need to aim. In the other modes only the text inside the white box is read.
AI fields Business
Tap the tags in the order you want them sent: Part No, Model No, Serial No, Batch No, Mfg Date, Exp Date, MRP, Net Qty. Each tag gets a number (1, 2, 3) as you tap it. Tap it again to remove it.
Need another field? Type its name in the Other fields box, for example Colour, IMEI (comma between).
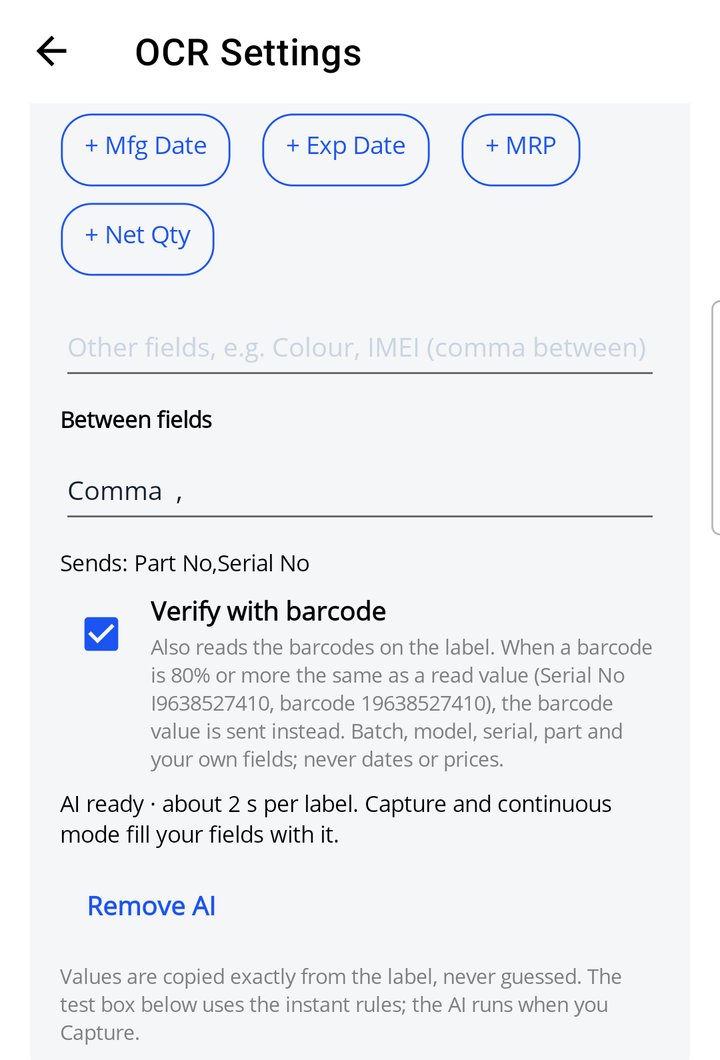
Between fields sets what is typed between the values: Same as Batch output, New line (Enter), Tab, Comma, Semicolon, Space, Nothing, or Other (type your own; + Key adds Enter or Tab). The line Sends: Part No,Serial No shows the result.
- The AI model downloads once (about 400 MB). Until then, fast rules fill the fields. When it is ready, the settings show AI ready · about 2 s per label.
- Values are always copied exactly from the label. The AI never invents a value.
- Reading takes about 2 seconds per label.
- Without Business, AI fields send all the text instead.
Verify with barcode Business
Tick Verify with barcode under the AI fields. Quickey then also reads the barcodes on the label. When a barcode is 80% or more the same as a value it read, the barcode value is sent instead. It checks both ways, so either one may have extra characters.
| OCR read | Barcode | Sent |
|---|---|---|
| DS9308-SR00004ZZY | 1PDS9308-SR00004ZZY | 1PDS9308-SR00004ZZY |
| I9638527410 | 19638527410 | 19638527410 |
- A barcode much longer than the value (a GS1 code with several fields) gives only its matching part.
- Dates, prices, quantities and values shorter than 5 characters are never replaced.
Tip: hold the label close enough that the barcode is sharp.
Basic rules: Find, Pick, Validate
Set Mode to Basic to pull out one value in three steps. Only the result is sent.
① FIND: locate your anchor
The Find picker offers A text I type below or Any number. With the first, type the word or label that always appears near the value, for example Asset. Exact word (on by default) matches Asset only; off also matches inside words such as AssetTag.
② PICK: cut out the characters to send
Count from the first character of the found text, starting at 1. Spaces count. In Asset 11: A=1, t=5, space=6, and 11 ends at 8, so Start at 1 and End at 8 sends Asset 11. Leave both blank to send just the found text itself.
③ VALIDATE: every rule must pass
Add rules with + Add validation. Each rule has a Type (Number, Letters, Letters + numbers, Symbol, Anything), a Where (All the text, Starts with, Ends with, Contains), a Count and, for Symbol, Which symbol (blank means a space). A new rule starts as Number · Ends with. If any rule fails, that spot is skipped and scanning continues. A blank count means "at least one".
Example for Asset 11: Number · Ends with · 2, then Symbol (space) · Contains · 1.
Regular expression and quick presets
Set Mode to Advanced and type a regular expression in the box instead of the three steps. The first match is sent. Wrap the part you want in parentheses to extract just that group.
Quick presets fill the box for common cases:
| Preset | Finds |
|---|---|
| 13-digit EAN | A retail barcode number printed as text |
| Price ₹ | A rupee amount such as ₹1,499.00 |
| Serial | A letters-and-digits serial number |
| Phone (10) | A 10-digit mobile number |
Prefix and suffix for OCR
Added around the extracted value before it is typed. The boxes and the + Key control keys (⏎ Enter, ⇥ Tab, ␊ LF, ␍ CR) behave exactly like the barcode ones: Enter or Tab at the end of the suffix is pressed as a real key, in the middle it types a character.
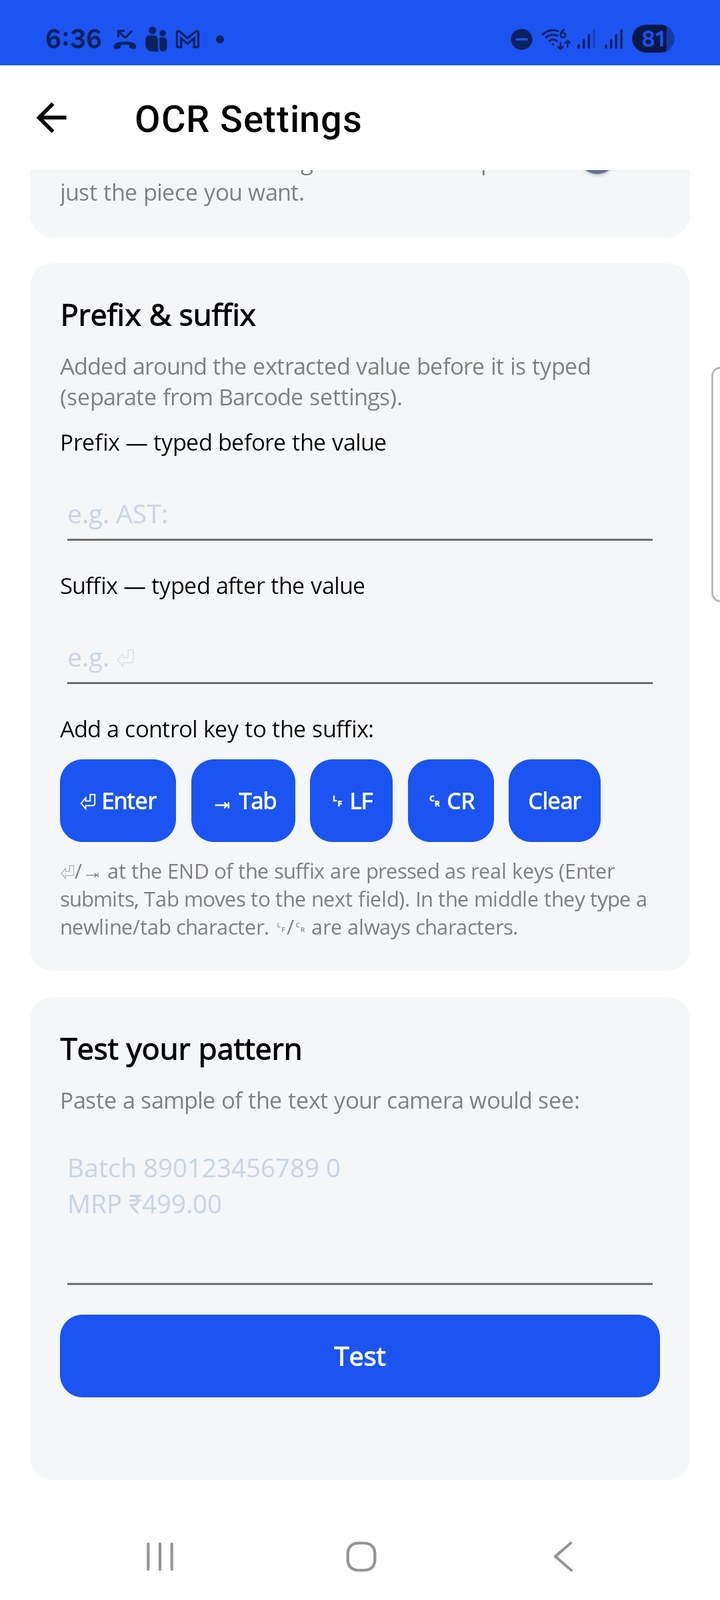
Test your pattern before you scan
At the bottom of OCR Settings, paste a sample of the text your camera would see (a line from a label, an invoice) into the Test your pattern box and tap Test. The app shows ✓ value and a Sends: line with your prefix and suffix, or which step failed, so you can adjust your rules without pointing the camera at anything.
With AI fields, the test box uses the fast rules. The AI itself runs when you Capture.